Setting up a Raspberry Pi NESPI case with RetroPi to make a retro console
Reading time: 3 minutes, 17 seconds
This article explains the steps to set up RetroPie, a software that bundles a lot of retro console emulators under one user interface. This allows you to make the ultimate retro gaming console for your TV.
This article is written mainly for myself so I don't forget the necessary steps in setting this up. However, maybe this is helpful for you, too.
Prerequisites
- NESPI case
- Raspberry Pi (I have the 3B version)
- SD card (I am using a 32GB one)
This assumes that you assembled the NESPI and added the Raspberry Pi to it already. It focusses on the steps to set up the RetroPie image and configure it.
Steps
Download the RetroPie image
Downloaded the correct RetroPie image for your Raspberry Pi model
Write the image to the SD card
I used the terminal as all other methods did not work for me and could not successfully write on my SD card:
sudo dd if=/path_to_image/retropie-buster-4.7.1-rpi2_3.img of=/dev/diskN (N = number of SD card)This will take a while - a LONG while. You can press ctrl-t while it is running to check how far it is.
Prepare WIFI connection
Create a file called wpa_supplicant.conf in your SD card's boot partition that looks like this
country=US
ctrl_interface=DIR=/var/run/wpa_supplicant GROUP=netdev
update_config=1

# RETROPIE CONFIG START
network={
    ssid="your_wifi_ssid"
    psk="your_wifi_password"
}
# RETROPIE CONFIG END
Careful: The # RETROPIE CONFIG END line is necessary so that the settings can be accessed through the UI later!
Enable SSH access
Since the NESPI does not come with a keyboard, it is good to set it up with SSH access so you can remote control it from a PC's terminal window (or even from a mobile phone - I will show this later).
Just create a file called ssh (no extension) in the boot partition as well. This will be removed on the next start and SSH will be enabled.
Give it a static IP and name
For easier access, it can be beneficial to give your Raspberry Pi a custom name (the default one is retropie) in your router. This enables you to access it via SSH with your chosen name instead of remembering its default name or looking up its current IP address:

Now you can access it from a terminal with
ssh pi@retro-nesThe default password is retropie.
If you get asked
The authenticity of host 'retro-nes (xxx.xxx.xxx.xxx)' can't be established.
ECDSA key fingerprint is SHA256:xxxxxxxxxxxxxxxxxxxxxxxxxxx.
Are you sure you want to continue connecting (yes/no/[fingerprint])?
just type yes. This will store your Raspberry Pi in the list of known hosts on your system.
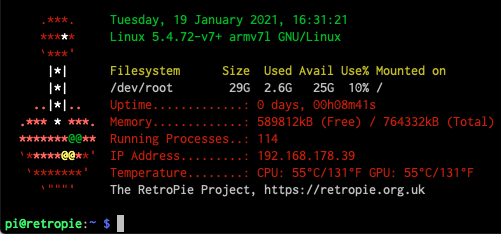
After logging in, you should see a command prompt similar to this:
Install the NESPI shutdown script
In order to make the power button of the NESPI case work, you need to install the shutdown script.
Note: The official shutdown script does not work correctly on newer revisions of the NESPI cases. You can use this command to download and execute a working one automatically from the Raspberry Pi command prompt through your terminal:
wget -O - "https://raw.githubusercontent.com/crcerror/retroflag-picase/master/install.sh" | sudo bashAfter installation, your Pi will reboot automatically and from now on, pressing the power off button should trigger a safe shutdown of the system.
Adding a game
Before adding a game rom, please note that it is not allowed to use roms of games you don't own already!
Adding games is easy via FTP - here are the settings you should use:
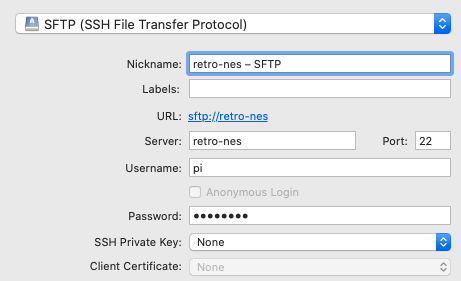
Again, the password is retropie!
After connecting, it should look like this:

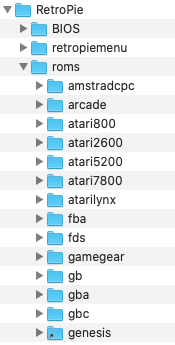
If you have a rom file for a specific system, drop it into the matching game system directory under RetroPie/roms/
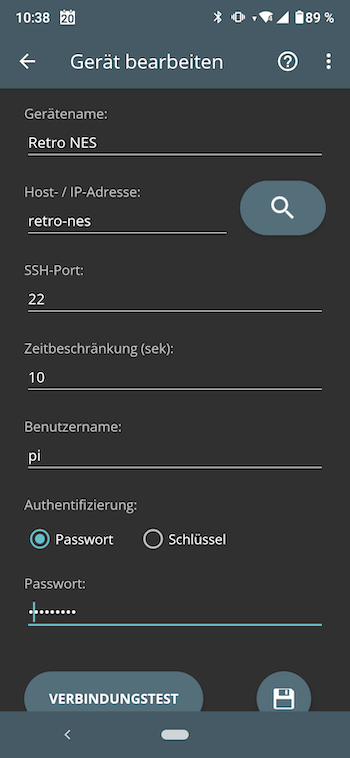
Accessing your Raspberry Pie with your phone
There are different apps to remote control and check your Raspberry. I have an Android phone and use RaspController. This has a file manager, SSH shell and can access data like CPU and memory consumption, temperature etc.
You can connect to it using the same settings as before: